Homemade Vol-au-Vent Shells with Puff Pastry, Flaky, Golden, and Ready to Fill
These homemade vol-au-vent shells are small puff pastry cases baked until tall, flaky, and hollow enough to hold a creamy filling. They are different from a full chicken pot pie because the pastry is baked separately, then filled just before serving so the layers stay crisp.
This recipe is based on my YouTube video, with a few adjustments since publication to make it easier to reproduce in a home oven. In the video, I use puff pastry from Jean-Michel at Pâtisserie 3M in Montreal, roll it out, cut the bases and rings, brush with egg wash, and bake the shells until puffed. For the written version, I prefer to add a chilling step and use a slightly hotter oven because puff pastry rises better when it goes into the oven cold and meets strong heat right away.
The mistake to avoid is brushing egg wash down the cut sides. It looks like a small detail, but it can glue the layers together and stop the pastry from lifting. What I look for here is a clean cut, cold dough, a light shine on top, and a shell that feels dry and crisp when you lift it from the tray.
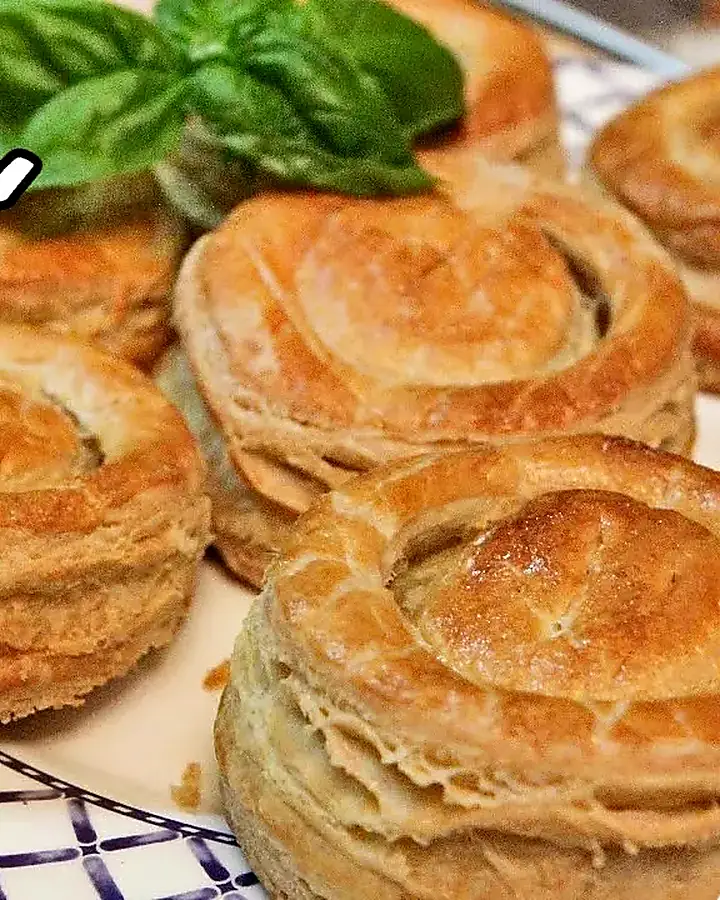
What Is a Vol-au-Vent?
A vol-au-vent is a baked puff pastry shell with a hollow center made to hold a savory filling. It is often filled with creamy chicken, seafood, mushrooms, or a white sauce, and it is served hot as a starter or as a comforting main dish.
This version is for the pastry shells only. That makes it useful year-round because you can fill them with leftover turkey after the holidays, creamy chicken on a cold night, seafood for a more elegant meal, or mushrooms when you want something meatless.
Why I Make the Shells This Way
I make it this way because the pastry needs height, not just color. A low oven can bake puff pastry, but it often gives a softer, flatter result. Starting hotter gives steam a chance to push the layers up before the butter melts too much.
I also prefer to chill the assembled shells before baking. It is not complicated. It is just 20 minutes in the fridge, but it makes the dough firmer, the cuts cleaner, and the rise more even.
The original video keeps the spirit of the classic technique, but this version is a bit more precise for home cooks in Canada and the USA, where store-bought puff pastry sheets can vary a lot in thickness and butter content.
Ingredients
- 1 lb all-butter puff pastry, cold
- All-purpose flour, for rolling
- 1 large egg
- 1 teaspoon water or milk, optional, for loosening the egg wash

Step-by-Step Instructions
1. Keep the puff pastry cold
Take the puff pastry out of the fridge only when you are ready to roll it. If it feels soft, sticky, or greasy, put it back in the fridge for 10 to 15 minutes.

Puff pastry works because cold butter sits between thin layers of dough. When the pastry hits the hot oven, the moisture turns to steam and lifts those layers. If the butter is already soft before baking, it leaks out instead of pushing the pastry upward.

2. Roll the pastry
Lightly flour the work surface and the top of the dough. Roll the pastry to about 1/8 inch thick. In the video, I roll the pastry quite thin, but for a reliable shell, 1/8 inch gives a better balance between lift and strength.

Keep the shape fairly even. A rectangle or large square is easier to work with. Move the dough often so it does not stick. Add flour only when needed. Too much flour dries the surface and can leave a dusty taste after baking.

At this point, the pastry should feel cool, smooth, and flexible, not soft like bread dough.

3. Cut the bases and rings
Use a round cutter, about 3 to 3 1/2 inches wide, to cut the bases. Press straight down without twisting. Twisting the cutter can seal the pastry layers, which reduces the rise.


For each shell, you need one solid round base and one ring. To make the ring, cut another large round, then cut out the middle with a smaller cutter, about 1 1/2 to 2 inches wide.
Keep the small centers. They can become the little pastry lids.

If the dough warms up while you cut, pause and chill it. The pastry should cut cleanly, not drag or stretch.
4. Assemble the shells
Place the solid bases on a parchment-lined baking sheet. Lightly prick only the center of each base with a fork. Do not prick the outer edge. That edge needs to rise and support the ring.

Beat the egg with the water or milk if using. Brush a very thin layer of egg wash around the outer edge of each base. Place one ring on top of each base.
Now brush the top of the rings with egg wash. Be careful. The egg wash should stay on top, not run down the sides. The sides are where the layers open, so keep them clean.

Brush the small pastry centers too. These will bake beside the shells and become the lids.
5. Chill before baking
Place the tray in the refrigerator for 20 minutes.
This is the small step that makes the recipe more dependable. The pastry firms up, the butter gets cold again, and the shells hold their shape better in the oven.

Meanwhile, heat the oven to 400°F.
6. Bake until lifted and dry
Bake at 400°F for 10 minutes, then lower the oven to 375°F and continue baking for 10 to 15 minutes, until the shells are puffed, golden, and crisp.
You know they are ready when the outside is well browned, the layers look separated, and the pastry feels light when lifted from the tray. Pale puff pastry usually means the center is still a bit doughy, so do not rush it.

Let the shells cool for a few minutes, then gently remove or press down the center. Fill them just before serving so the pastry stays flaky.
What to Fill Them With
The classic route is a creamy chicken filling, similar in spirit to a comforting chicken pot pie filling, but served inside individual shells instead of under a full crust. A simple white sauce is also very useful here. If you want a base that stays smooth and coats the filling properly, use the technique from a basic white sauce.
For a richer filling, mushrooms and cream work beautifully. The sauce should be thick enough to spoon, not so loose that it soaks the pastry. The same idea applies when making a creamy sauce that holds together. If your filling looks too thin, reduce it in the pan or use the method from thickening a sauce without making it heavy.
For chicken, small pieces are better than large chunks. They fit inside the shell and give a cleaner bite. Leftover roast chicken, turkey, or even a creamy version inspired by chicken supreme works very well.
How This Recipe Is Different from Similar Recipes
This is not a full pie and it is not a creamy casserole. The pastry shells are baked separately, then filled at the end. That makes them lighter and more delicate than a baked chicken Alfredo-style dish, and more classic French bistro than a weeknight skillet meal.
It is also different from sausage rolls or stuffed puff pastry because the filling does not bake inside the dough. If you want a pastry recipe where the meat is enclosed before baking, something like homemade sausage rolls is the better match.

These shells are mainly about technique: clean cuts, cold dough, controlled egg wash, and proper baking. Once you have that, the filling can change with the season.
Substitutions
Puff pastry
All-butter puff pastry gives the best flavor and lift. Regular store-bought puff pastry will still work, but it may taste less buttery and sometimes rises less evenly.
Egg wash
You can use only beaten egg, or egg with a small splash of milk or water. Milk gives a slightly softer shine. Egg alone gives a deeper color.
Filling ideas
Chicken and mushrooms are the classic choice. Seafood is very good too, especially shrimp or scallops in a cream sauce. For a meatless version, use sautéed mushrooms, leeks, peas, and a thick white sauce.
Flour
Use only enough flour to stop sticking. Parchment paper is better than flouring the baking sheet heavily because it keeps the bottoms cleaner.
FAQ
Can I make vol-au-vent shells ahead of time?
Yes. Bake the shells, cool them completely, and store them at room temperature in an airtight container for 1 day. Reheat them briefly in a 325°F oven before filling so they crisp back up.
Can I freeze them?
You can freeze the unbaked assembled shells before egg washing. Freeze on a tray, then transfer to a container. Bake from frozen after brushing with egg wash, adding a few extra minutes.
Why did my puff pastry not rise?
The dough may have been too warm, the cutter may have twisted and sealed the edges, or egg wash may have dripped down the sides. A dull cutter can also crush the layers.
Why is the center full instead of hollow?
The base puffed up. Lightly prick only the center before baking, then press the center down gently after baking if needed.
Can I bake them at 350°F like in the video?
Yes, but the rise may be less dramatic and the baking time will be longer. For more reliable puff pastry shells, I prefer the hotter start.
What filling should I use first?
Start with chicken in a thick white sauce. It is the most forgiving. If you need a hearty side dish to serve beside it, classic pommes boulangères or a creamy gratin dauphinois both fit the French comfort-food style.
What to Serve With Vol-au-Vent
These shells are rich because puff pastry is made with a lot of butter, so I like serving them with something fresh or simple on the side. A crisp salad cuts through the cream nicely. For a more filling plate, potatoes are a natural match.
Good pairings:
- classic pommes boulangères for a traditional French side
- gratin dauphinois with cream for a richer dinner
- creamy mushroom chicken thighs if you want filling inspiration
- classic blanquette de veau for another creamy French-style dish
- beef tips with gravy if you want a darker, heartier sauce idea
- homemade brown stock for a deeper sauce base

Homemade Vol-au-Vent Shells with Puff Pastry, Flaky, Golden, and Ready to Fill
Ingredients
- 1 lb all-butter puff pastry cold
- 2 tablespoons all-purpose flour for rolling, use more only if needed
- 1 large egg beaten
- 1 teaspoon water or milk optional
Instructions
- Lightly flour the work surface and roll the cold puff pastry to about 1/8 inch thick.
- Cut 6 large rounds for the bases using a 3 to 3 1/2 inch cutter. Press straight down without twisting.
- Cut 6 more large rounds, then cut out the centers with a smaller cutter to make rings. Keep the small centers for lids.
- Place the bases on a parchment-lined baking sheet. Lightly prick only the center of each base with a fork.
- Brush a thin layer of egg wash around the edge of each base, then place one pastry ring on top.
- Brush the top of each ring with egg wash, keeping the egg wash off the cut sides. Brush the small lids too.
- Chill the assembled shells for 20 minutes.
- Heat the oven to 400°F.
- Bake for 10 minutes, then reduce the oven to 375°F and bake 10 to 15 minutes more, until puffed, golden, crisp, and dry.
- Let cool slightly, remove or gently press down the center, then fill just before serving.
Video
Notes
FAQ
Can I make vol-au-vent shells ahead of time?
Yes. Bake the shells, cool them completely, and store them at room temperature in an airtight container for 1 day. Reheat them briefly in a 325°F oven before filling so they crisp back up.Can I freeze them?
You can freeze the unbaked assembled shells before egg washing. Freeze on a tray, then transfer to a container. Bake from frozen after brushing with egg wash, adding a few extra minutes.Why did my puff pastry not rise?
The dough may have been too warm, the cutter may have twisted and sealed the edges, or egg wash may have dripped down the sides. A dull cutter can also crush the layers.Why is the center full instead of hollow?
The base puffed up. Lightly prick only the center before baking, then press the center down gently after baking if needed.Can I bake them at 350°F like in the video?
Yes, but the rise may be less dramatic and the baking time will be longer. For more reliable puff pastry shells, I prefer the hotter start.What filling should I use first?
Start with chicken in a thick white sauce. It is the most forgiving. If you need a hearty side dish to serve beside it, classic pommes boulangères or a creamy gratin dauphinois both fit the French comfort-food style.🔗 Useful Links
🛒 Michel Dumas Shop : Explore our kitchen essentials, including aprons and knives.
🌐 Linktree : Access all our important links in one place.
📱 YouTube | Instagram | Facebook | TikTok : Follow us for the latest recipes and culinary tips.