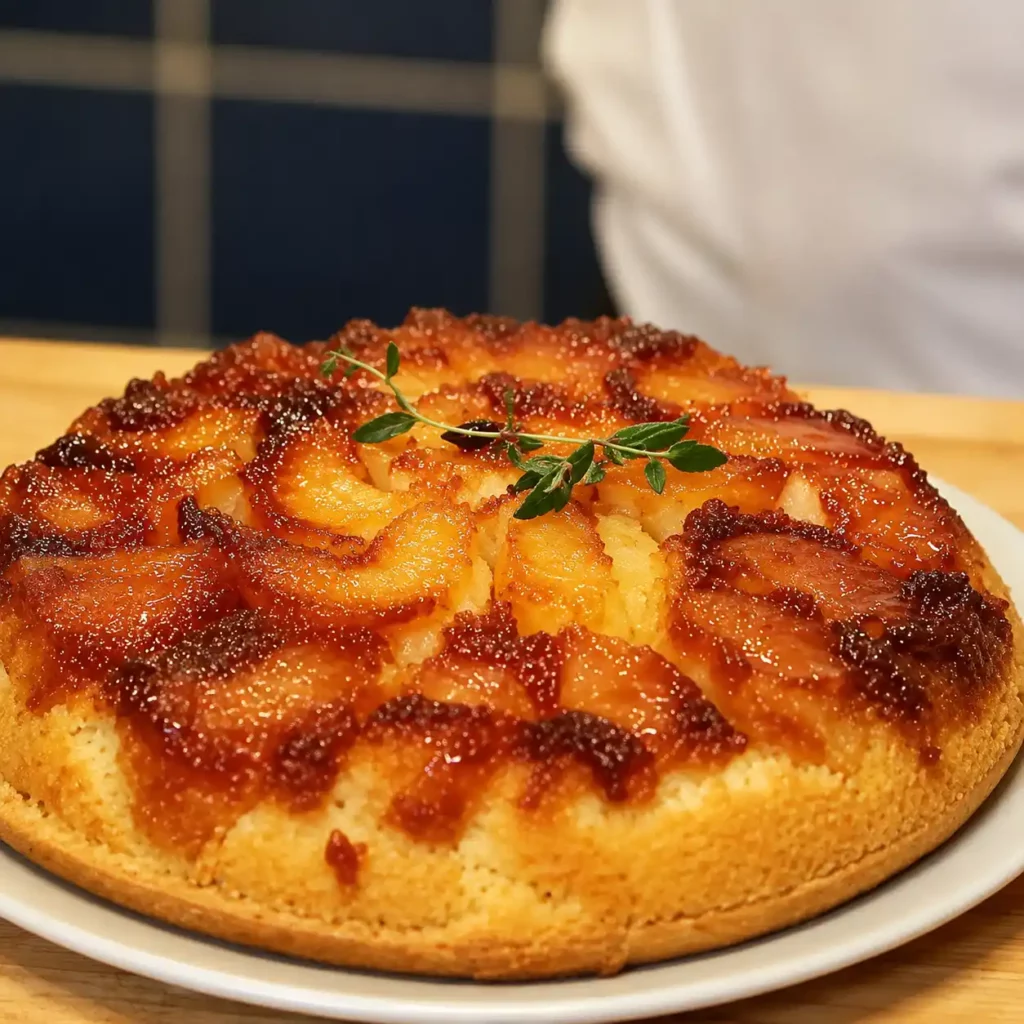
Caramelized Apple Upside-Down Cake, Easy 9-Inch Dessert
This caramelized apple upside-down cake sits somewhere between a French tarte Tatin and a soft home-style apple cake. The apples cook directly against a layer of caramel, then the cake is flipped after baking so the glossy fruit becomes the top.
This recipe is based on my YouTube video, with a few adjustments since publication to make the proportions more reliable for home ovens in Canada and the USA. In the video, I used a commercial cake mix to keep the preparation simple, but here I specify the pan size, apple quantity, caramel amount, and baking cues more clearly so the result is easier to repeat.
The main thing that makes this dessert work is the balance between the caramel layer, the apples, and the thickness of the batter. I make it this way because the caramel gives the apples that deep golden flavor without needing a pastry crust. The mistake to avoid is overfilling the pan. A boxed cake mix can make a lot of batter, and once the apples are already in the pan, there may not be room for all of it.
At this point, the cake should feel like a simple fruit dessert, not a pastry project. You want the caramel amber but not burnt, the apples packed into the bottom of the pan, and the batter spread gently over the top without disturbing the fruit too much.
What Is a Caramelized Apple Upside-Down Cake?
A caramelized apple upside-down cake is a baked fruit cake where apples and caramel go into the pan first, then cake batter is poured over them. After baking, the cake is turned out onto a plate so the caramel-coated apples become the top.
It is different from a classic French apple tarte Tatin because there is no pastry crust. It is also different from a cherry clafoutis because the texture is more like soft cake than baked custard. I would make this in apple season after picking fresh apples, but it also works year-round with grocery store apples.
Why I Make It This Way
In the original video, I had wild apples from the countryside. They were not perfectly even, and I did not know exactly how they would behave in the oven. That is why I chose a forgiving dessert: caramel on the bottom, apples arranged over it, and a simple cake batter on top.
I prefer to cut the apples into fairly even pieces instead of leaving them in large uneven chunks. They do not need to be perfect cubes, but they should be similar in size. What I look for here is even coverage across the bottom of the pan. If one side has a mountain of apples and the other side is almost empty, the cake will bake unevenly and the flipped top will look patchy.
For the batter, a commercial yellow or vanilla cake mix is completely acceptable here. The important correction is this: prepare the cake mix according to the box you are using. In the video, the mix required 3 large eggs and 1 1/3 cups of water. Some cake mixes also require oil or melted butter. If your box calls for it, add it. Otherwise, the cake can come out dry or rubbery.
How This Recipe Is Different From Similar Apple Desserts
This recipe is not meant to replace an apple pie or a crisp. It has its own place.
Compared with apple crisp with oats, this cake is softer and more caramel-focused. There is no crumble topping, no oats, and no separate crunchy layer.
Compared with puff pastry apple parcels, this is more of a family-style cake. No folding, no sealing, no puff pastry. The structure comes from the batter and the caramelized fruit.
Compared with tarte Tatin, this version is easier because there is no crust to roll or handle. The apples still get that caramel flavor, but the base is a soft cake instead of pastry.
Compared with a basic one-bowl vanilla cake, this dessert has a fruit layer and a caramel topping built into the bake. That makes it more moist, slightly sticky on top, and better served from a plate rather than sliced straight from the pan.
Choosing the Apples
Use apples that hold their shape but still soften nicely. Honeycrisp, Cortland, Empire, Gala, Golden Delicious, and McIntosh can all work, but they behave differently.
Firm apples hold a cleaner pattern after unmolding. Softer apples melt more into the caramel, which tastes good but gives a more rustic look. Wild apples are fine too, especially if they are slightly tart. The caramel needs that bit of acidity.

You need about 1 1/2 pounds of apples after trimming, or about 5 to 6 medium apples. If the apples are small, use more. What matters is that the bottom of the pan is well covered.
I keep the trimmings for applesauce when I have enough. The peels and odd pieces are not useful for the top of this cake, but they still have flavor.
Making the Caramel
The caramel is simple, but this is the step that needs attention. Add the sugar and a small splash of water to a saucepan. Stir only at the beginning to moisten the sugar, then leave it alone once it starts boiling.

At first, the syrup will look clear and bubbly. Then the bubbles get thicker. After a few minutes, the edges begin to turn pale gold, then amber. You know it is ready when the color looks like maple syrup or light honey. If it smells sharp or smoky, it has gone too far.
Do not put your finger near it, and do not taste it from the spoon. Caramel is much hotter than boiling water. Pour it carefully into a solid 9-inch cake pan or ovenproof skillet, then tilt the pan gently so it coats the bottom.
This caramel step is close in spirit to the one used in crème caramel, but here the caramel is not just a sauce. It becomes the glossy apple topping after the cake is flipped.
Step-by-Step Instructions
Preheat the oven to 350°F for a regular oven. If using convection, use 325°F.
Peel the apples, cut them in half, and remove the cores. Cut the pieces into even chunks or thick slices. I like a slightly geometric cut because it makes the finished top look more organized, but rustic pieces are fine.

Make the caramel with sugar and water. Cook until amber, then immediately pour it into a deep 9-inch pan. The pan should be at least 2 inches deep. Do not use a loose-bottom tart pan or a springform pan unless it is extremely leakproof, because hot caramel can leak.


Arrange the apples over the caramel. Pack them in fairly tightly because they shrink during baking. The first layer is the one people will see after unmolding, so place the nicest pieces against the caramel.


Prepare the cake batter according to the package directions. If the box asks for eggs, water, and oil, use all of them. If the box only asks for eggs and water, follow that. The batter should be smooth and pourable, not thick like cookie dough.

Pour the batter gently over the apples. Stop before the pan is more than three-quarters full. This is important. If you have extra batter, bake it in ramekins or a small separate dish.

Place the pan on a baking sheet, just in case a little caramel bubbles up. Bake on the middle rack until the center is set and a toothpick inserted into the cake layer comes out with dry crumbs. Avoid poking directly into an apple piece, because that can make the toothpick look wet even when the batter is cooked.

Let the cake rest for 5 to 10 minutes. Run a knife around the edge. Place a rimmed serving plate over the pan, hold both firmly, and flip in one confident motion. Lift the pan slowly. If a few apple pieces stay behind, place them back on the cake with a spoon.
What the Finished Cake Should Look Like
The top should be glossy, golden, and slightly uneven in a good way. The caramel may run a little around the edges, especially while warm. That is normal.
The cake layer should be soft but not soggy. If it collapses in the center, it was probably underbaked or overloaded with apples. If the top tastes bitter, the caramel was too dark. If the cake sticks badly, it likely sat too long before unmolding or the caramel cooled too firmly in the pan.
I like serving it warm, when the caramel is still soft and the apple smell is strongest. It is also good at room temperature. Cold from the fridge, the texture gets firmer, so I prefer to warm slices slightly before serving.
Health and Nutrition Context
This is a real dessert with sugar, cake batter, and caramel. It is not a light snack or a high-protein recipe. The apples add fruit, moisture, and acidity, but the cake is still meant to be enjoyed as a sweet baked dessert.
For a smaller portion, cut thinner slices and serve it with coffee or tea. If you want something fruit-based but less cake-like, red wine poached pears are a good alternative. For something more rustic and oat-based, the apple crisp is the better direction.
Substitutions
Use pears instead of apples if they are firm. Very ripe pears release too much liquid and can make the cake wet.
Use brown sugar for a deeper caramel taste, but it is harder to judge the color because it starts dark. For the first try, white sugar is easier.
Use a homemade vanilla cake batter instead of boxed mix if you prefer. A simple batter like the one in a basic vanilla cake works well because it does not fight the apple flavor.
Add cinnamon if you want a warmer fall flavor. Use a light hand. Too much cinnamon can hide the caramel.
Add a pinch of salt to the caramel or batter. It makes the sweetness taste rounder without making the cake salty.
Use a lemon yogurt-style batter if you want a brighter cake layer. A dessert like lemon yogurt cake gives a good idea of how citrus can make a simple cake taste fresher.
FAQ
Can I use a boxed cake mix?
Yes. That is what makes this version practical. The key is to follow the instructions on your cake mix box. In the video, the mix used 3 large eggs and 1 1/3 cups water, but not every brand is the same.
Can I make this with homemade cake batter?
Yes. Use a simple vanilla cake batter that fits one 9-inch cake pan. Avoid very thick pound cake batter because it can be heavy over the apples and take longer to bake.
Why did my cake overflow?
The pan was probably too shallow or too full. Fill the pan only three-quarters full. Bake extra batter in ramekins.
Why did the apples stick to the pan?
The cake may have cooled too long before unmolding. Let it rest 5 to 10 minutes, then flip while the caramel is still fluid.
Can I make it ahead?
Yes, but it is best the day it is baked. Store leftovers covered in the fridge and warm slices gently before serving.
Can I use a springform pan?
I do not recommend it. Caramel can leak through the bottom and burn on the oven floor. Use a solid cake pan or ovenproof skillet.
How do I know when the caramel is ready?
Look for an amber color and a warm caramel smell. It should not smell burnt or smoky. For tablespoon and cup help, use a practical kitchen measurement conversion guide when adjusting small quantities.
What to Serve With It
This cake is good on its own, but a spoonful of whipped cream or vanilla ice cream works well because it softens the caramel. For a full dessert table, pair it with something creamy and something chocolate or custard-based.
Try serving it with creamy vanilla rice pudding if you want a gentle, old-fashioned dessert beside it. For a richer French-style option, classic île flottante gives a nice contrast with light meringue and custard.
For another fruit dessert that feels easy and North American, peach cobbler with canned peaches is a good match. If you want something more chocolatey on the table, moist dark chocolate cake gives a stronger contrast.
Suggested Posts
Cup, gram, and milliliter conversion guide

Caramelized Apple Upside-Down Cake
Ingredients
- 1 cup granulated sugar
- 3 to 4 tablespoons water
- 1 pinch salt optional
- 1 1/2 pounds apples peeled, cored, and cut into even chunks or thick slices
- 1 box yellow or vanilla cake mix
- Eggs water, oil, or butter as required on the cake mix package
- In the video version: 3 large eggs and 1 1/3 cups water were used
- Butter or baking spray for the sides of the pan
- Fresh mint leaves for garnish, optional
Instructions
- Preheat the oven to 350°F for a regular oven, or 325°F for convection.
- Lightly butter or spray the sides of a deep 9-inch solid cake pan or ovenproof skillet. Do not use a loose-bottom pan.
- Add the sugar and water to a saucepan. Stir only to moisten the sugar, then cook without stirring until the caramel turns amber.
- Carefully pour the hot caramel into the bottom of the pan. Tilt the pan gently to spread it evenly.
- Arrange the apples over the caramel in a tight layer. Place the nicest pieces against the caramel because they will become the top after unmolding.
- Prepare the cake mix according to the package directions. Use the eggs, water, oil, or butter required by your specific brand.
- Pour the batter gently over the apples. Do not fill the pan more than three-quarters full. Bake any extra batter in ramekins.
- Place the pan on a baking sheet and bake on the middle rack for 45 to 55 minutes, or until the cake is set and a toothpick inserted into the cake layer comes out with dry crumbs.
- Let the cake rest for 5 to 10 minutes. Run a knife around the edge.
- Place a rimmed serving plate over the pan and flip carefully. Lift the pan slowly and spoon any loose caramel or apple pieces back over the top.
- Garnish with mint if desired. Serve warm or at room temperature.
Video
Notes
FAQ
Can I use a boxed cake mix?
Yes. That is what makes this version practical. The key is to follow the instructions on your cake mix box. In the video, the mix used 3 large eggs and 1 1/3 cups water, but not every brand is the same.Can I make this with homemade cake batter?
Yes. Use a simple vanilla cake batter that fits one 9-inch cake pan. Avoid very thick pound cake batter because it can be heavy over the apples and take longer to bake.Why did my cake overflow?
The pan was probably too shallow or too full. Fill the pan only three-quarters full. Bake extra batter in ramekins.Why did the apples stick to the pan?
The cake may have cooled too long before unmolding. Let it rest 5 to 10 minutes, then flip while the caramel is still fluid.Can I make it ahead?
Yes, but it is best the day it is baked. Store leftovers covered in the fridge and warm slices gently before serving.Can I use a springform pan?
I do not recommend it. Caramel can leak through the bottom and burn on the oven floor. Use a solid cake pan or ovenproof skillet.How do I know when the caramel is ready?
Look for an amber color and a warm caramel smell. It should not smell burnt or smoky. For tablespoon and cup help, use a practical kitchen measurement conversion guide when adjusting small quantities.🔗 Useful Links
🛒 Michel Dumas Shop : Explore our kitchen essentials, including aprons and knives.
🌐 Linktree : Access all our important links in one place.
📱 YouTube | Instagram | Facebook | TikTok : Follow us for the latest recipes and culinary tips.