Canadian Butter Tarts with Flaky Homemade Pastry
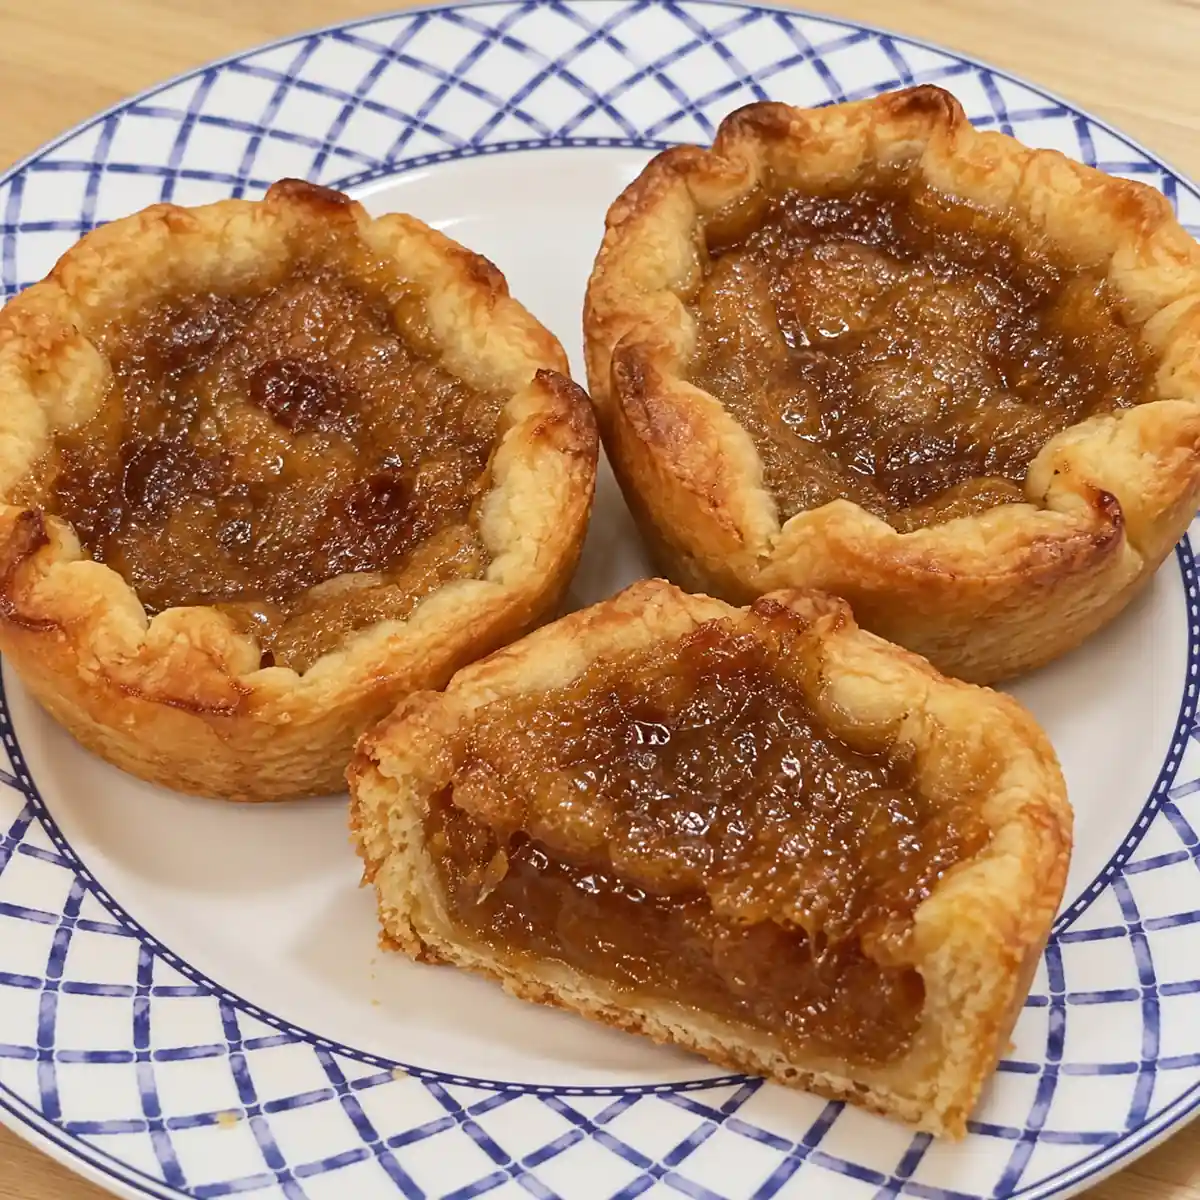
These Canadian butter tarts have a flaky butter crust and a soft, sticky brown sugar filling with a thin golden surface. They are baked in a regular muffin pan, so no special tart moulds are needed. Keep the pastry cold, leave space above the filling and let the tarts cool before lifting them out for neat, intact shells.
This version is plain, without raisins or nuts, so the pastry and buttery filling stay at the centre of the recipe. The filling is soft once cooled, with enough body to stay in the shell when you take a bite. For a similar flavour in a pan dessert, butter tart squares are another option.
Cold butter makes the pastry flaky
Cut the butter into small cubes and keep it refrigerated until needed. Work it into the flour until the mixture has coarse crumbs and some pea-sized pieces. Those small pieces of butter help create flaky layers. If you rub everything into a smooth paste before adding water, the crust will be more short and crumbly than flaky.
Add ice water gradually. Flour absorbs differently depending on the brand and humidity, so the final tablespoon is a decision, not an obligation. Stop when a handful of dough holds together when squeezed. It should not look wet or feel sticky. Gather it gently rather than kneading as you would bread dough.
Resting in the refrigerator allows the flour to hydrate and the dough to relax. If the dough cracks badly when rolled, let it stand a few minutes at room temperature. If it becomes greasy or soft, chill it again. Neither extra flour nor force is a good substitute for the right dough temperature.
Make room for the filling to rise
Use a standard twelve-cup muffin pan. Cut pastry rounds about four inches across and ease them into the cups with small natural folds. Do not stretch the dough tightly down the walls, because it will shrink back during baking. Patch a crack with a small piece of dough before filling.
The shells should come close to the rim. Chill the lined pan for twenty minutes while you make the filling. This second rest helps the pastry hold its shape in the hot oven. There is no blind baking in this recipe; the shells and filling cook together.
Do not prick the bottoms with a fork. Holes allow the sugary filling to leak into the pan and stick. The same attention to an intact shell matters with fruit pastries such as apple turnovers and puff pastry apple parcels, though those recipes use a different pastry.
Shape, fill and bake
Roll the pastry and line the pan
After the dough has chilled for forty-five minutes, roll it on a lightly floured surface to about one-eighth inch thick. Cut twelve four-inch rounds, gathering and rerolling scraps gently as needed. Fit them into the muffin cups without stretching. If the kitchen is warm, work with half the dough at a time.

Keep the rims reasonably even so one thin section does not burn before the rest is golden. Small folds are normal and give homemade butter tarts their familiar shape. Avoid pressing several thick layers together at the bottom of a cup, where they may stay doughy.
Stir the filling gently
Heat the oven to 400°F with a rack in the lower third. Stir the melted, cooled butter with the brown sugar and light corn syrup until evenly combined. Stir in the egg, vanilla, vinegar and salt. Mix gently rather than whisking a lot of air into the filling.

The vinegar is a small amount and will not make the tarts taste sour. The corn syrup helps keep the filling smooth and soft. Use regular light corn syrup, not a reduced-sugar syrup or a thick dessert sauce. A few small brown sugar specks are fine, but break up any large hard lumps before adding the egg.
Fill below the rim
Divide the filling between the cold shells, about two tablespoons per tart. Keep each shell no more than two-thirds full. If your muffin cups are unusually small, leave excess filling out rather than risking an overflow. Put the pan directly on the oven rack so heat can reach the pastry base.

Bake for twenty to twenty-five minutes, until the pastry is golden and the filling is puffed and set at the edges with a slight wobble in the middle. It should not slosh like raw liquid. Cool in the pan for fifteen minutes, then gently loosen the edges and lift onto a rack. Let cool fully before serving so the filling can settle.

Chef tips
My advice is to check the oven temperature if the filling browns while the pastry stays pale. Preheat fully and use an oven thermometer if your baking often needs extra time. The lower rack position helps the bottom cook. Dark muffin pans brown faster than light metal, so begin checking at twenty minutes.
If a little filling bubbles over, loosen that spot while the tarts are still slightly warm. Once the sugar becomes hard and cold, it acts like glue. Use a thin blunt knife or small offset spatula carefully around the outside, without cutting through the pastry wall.
These are rich little desserts, so one per person is usually a useful starting portion. On a dessert tray, combine them with chewy chocolate chip cookies or lemon yuzu bars for a different flavour and texture.
Substitutions
For a raisin version, I’d divide a third of a cup of raisins among the shells before pouring in the filling. Chopped pecans can be used in the same amount. Leave the filling level below two-thirds of the shell; adding fruit or nuts reduces the available space. The plain version shown does not include either addition.
You can use enough prepared all-butter pie dough for twelve four-inch rounds, following its chilling instructions. Do not replace the corn syrup with an arbitrary amount of maple syrup and expect an identical texture. For a dessert built around maple syrup, maple pouding chômeur uses its liquid content deliberately.

Frequently asked questions
Can I make the dough ahead?
Yes. Wrap tightly and refrigerate for up to two days, or freeze for up to two months. Thaw frozen dough overnight in the refrigerator. Let it soften just enough to roll without cracking, then chill the shaped shells again before filling.
Why did the filling overflow?
The shells may have been filled too high, or the filling may have been beaten until foamy. It expands during baking, so leave room. Keeping the pastry cold and the oven fully preheated also helps the shells establish their shape promptly.
How do I store the tarts?
Once cool, refrigerate in a covered container for up to five days. Bring to room temperature before serving. Freeze in a single layer, then pack carefully and keep up to two months. Thaw in the refrigerator. The pastry is crispest on the day of baking and gradually softens during storage.
More baking for a Canadian table
For a larger fruit dessert, try apple crisp or apple upside-down cake. Cocoa brownies and banana chocolate chip muffins are easy to portion for a gathering. A lemon yogurt cake gives a brighter finish when you want something less concentrated than a butter tart.

Canadian Butter Tarts with Flaky Homemade Pastry
Ingredients
- 2 cups all-purpose flour spooned and levelled
- 1/2 teaspoon fine salt for pastry
- 3/4 cup cold unsalted butter cubed, for pastry
- 5 to 6 tablespoons ice water as needed
- 1 cup packed light brown sugar
- 1/3 cup light corn syrup
- 1/4 cup unsalted butter melted and cooled, for filling
- 1 large egg
- 1 teaspoon vanilla extract
- 1 teaspoon white vinegar
- 1/8 teaspoon fine salt for filling
Instructions
- Mix flour and pastry salt. Cut in cold butter until coarse crumbs with pea-sized pieces remain. Add 5 tablespoons ice water, then up to 1 more as needed for dough to hold when squeezed. Gather into a disc, wrap and chill 45 minutes.
- Roll to 1/8-inch thickness. Cut twelve 4-inch rounds, rerolling scraps gently. Ease into a standard 12-cup muffin pan without stretching or piercing. Chill 20 minutes.
- Heat oven to 400°F, rack in lower third. Stir brown sugar, corn syrup and melted cooled butter. Stir in egg, vanilla, vinegar and filling salt without whipping in air.
- Divide filling among shells, about 2 tablespoons each, never more than two-thirds full.
- Bake 20–25 minutes until pastry is golden and filling is puffed and set at edges with a slight centre wobble, not liquid sloshing.
- Cool in pan 15 minutes. Loosen edges carefully, lift onto a rack and cool completely before serving.



 Last chance for our paring knives.